Introduction

Depending on where your website visitors are coming from, you may be required to give users the option of opting into cookies before you start storing them. There are several libraries you can plug into your code to get this functionality, such as CookieYes, but this post will walk through building your own cookie consent banner from scratch.

In this example, I will be using SvelteKit to build the cookie consent banner, but the same ideas can be used to build the banner in any framework.

Google Tag Manager

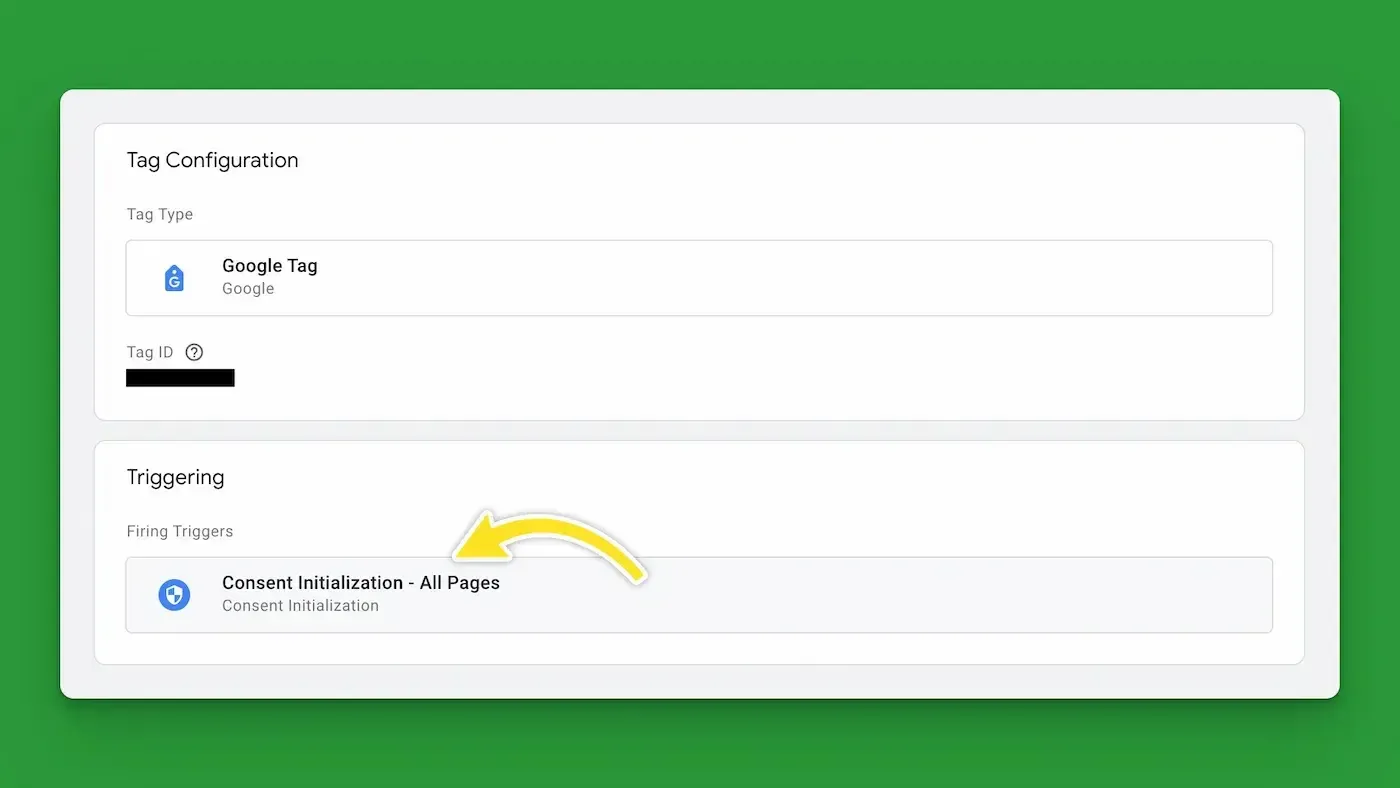
The easiest way to get started is to load all your website tracking scripts via Google's Tag Manager. Then you can set the Trigger to Consent Initialization - All Pages so the scripts only load after consent has been given by the user.

A screenshot of Google Tag Manager's tag configuration with a yellow arrow pointing to the Consent Initialization - All Pages trigger

Ask for permission; not forgiveness

It's important that you respect the user's right to decide whether or not they want to be served cookies. You should assume that the user doesn't consent to cookies until they've explicitly opted in via your cookie consent banner.

Add functionality to the consent banner

We'll start building out our custom consent banner by adding the functionality that will be used to set the user's consent preferences. If you're not building your consent banner with Svelte, you can still take the functions below and modify them to fit your website's needs.

consent-functions

<script>
  import { dev, browser } from '$app/environment';
  import { onMount } from 'svelte';

  let
    showBanner = false,
    currentConsentMode = {}, // get current consent mode in localStorage onMount
    screen = 'MAIN'; // MAIN = accept, reject, more options, OPTIONS = toggle options;

  /**
   * This is the function we're going to use to tell Google Tag Manager
   * the user's consent preferences, and also save their preferences in localStorage
   * @param consent
   */
  function setConsent(consent) {
    // get up dataLayer and gtag https://developers.google.com/tag- platform/tag-manager/datalayer
    window.dataLayer = window.dataLayer || [];

    function gtag() {
      dataLayer.push(arguments);
    }

    // set the consentMode based on the users response to the consent banner
    const consentMode = {
      'functionality_storage': consent.necessary ? 'granted' : 'denied',
      'security_storage': consent.necessary ? 'granted' : 'denied',
      'ad_storage': consent.marketing ? 'granted' : 'denied',
      'analytics_storage': consent.analytics ? 'granted' : 'denied',
      'personalization_storage': consent.preferences ? 'granted' : 'denied',
    };

    // update the users consent in Google Tag Manager
    gtag('consent', 'update', consentMode);

    // save user's preferences to localStorage so they don't have to consent every time they visit our website
    localStorage.setItem('consentMode', JSON.stringify(consentMode));
  }

  /**
   * This is the function that will run whenever the user clicks Accepts All on our banner
   */
  function acceptConsent() {
    if (localStorage.getItem('consentMode') === null) {
      setConsent({
        necessary: true,
        analytics: true,
        preferences: true,
        marketing: true
      });
      showBanner = false;
    }
  };

  /**
   * This is the function that will run whenever the user clicks Rejects All on our banner
   */
  function rejectConsent() {
    if (localStorage.getItem('consentMode') === null) {
      setConsent({
        necessary: false,
        analytics: false,
        preferences: false,
        marketing: false
      });
      showBanner = false;
    }
  };
  
  /**
   * This is the function that will run whenever the user consents to custom options
   */
  function customizedConsent(e) {
    let newConsent = {}
    const data = new FormData(e.target);
    const consent = {
      necessary: data.get('necessary_consent'),
      marketing: data.get('marketing_consent'),
      analytics: data.get('analytics_consent'),
      preferences: data.get('preferences_consent')
    };

    // fill out the newConsent object based on options the user selected
    Object.entries(consent).forEach(([key, value]) => {
      if (value === 'on') {
        newConsent[key] = 'granted';
      }
    });

    setConsent(newConsent);
    showBanner = false;
  }
</script>

Load the scripts from Google Tag Manager

Next, we can load the scripts you've set up in Google Tag Manager. Since I'm building a component using SvelteKit, I'm going to load this in my component using a <svelte:head> tag. You can use whatever method makes sense to add this to the document's head tag.

The installation instructions for the Google Tag Manager script used below can be found in your Google Tag Manager's Admin section.

loading-google-tag-manager

<svelte:head>
  <!-- disable tracking until consent is given -->
  <script>
    // get up dataLayer and gtag https://developers.google.com/tag- platform/tag-manager/datalayer
    window.dataLayer = window.dataLayer || [];

    function gtag() {
      dataLayer.push(arguments);
    }

    // default to no consent
    if (localStorage.getItem('consentMode') === null) {
      gtag('consent', 'default', {
        'ad_storage': 'denied',
        'analytics_storage': 'denied',
        'personalization_storage': 'denied',
        'functionality_storage': 'denied',
        'security_storage': 'denied',
      });
    } else {
      gtag('consent', 'default', JSON.parse(localStorage.getItem('consentMode')));
    }
  </script>

  <!-- google tag manager script that will load all tags -->
  <script>
    (function (w, d, s, l, i) {
      w[l] = w[l] || [];
      w[l].push({ 'gtm.start': new Date().getTime(), event: 'gtm.js' });
      var f = d.getElementsByTagName(s)[0],
          j = d.createElement(s),
          dl = l != 'dataLayer' ? '&l=' + l : '';
      j.async = true;
      j.src = 'https://www.googletagmanager.com/gtm.js?id=' + i + dl;
      f.parentNode.insertBefore(j, f);
    })(window, document, 'script', 'dataLayer', 'YOUR_GTM_ID');
  </script>
</svelte:head>

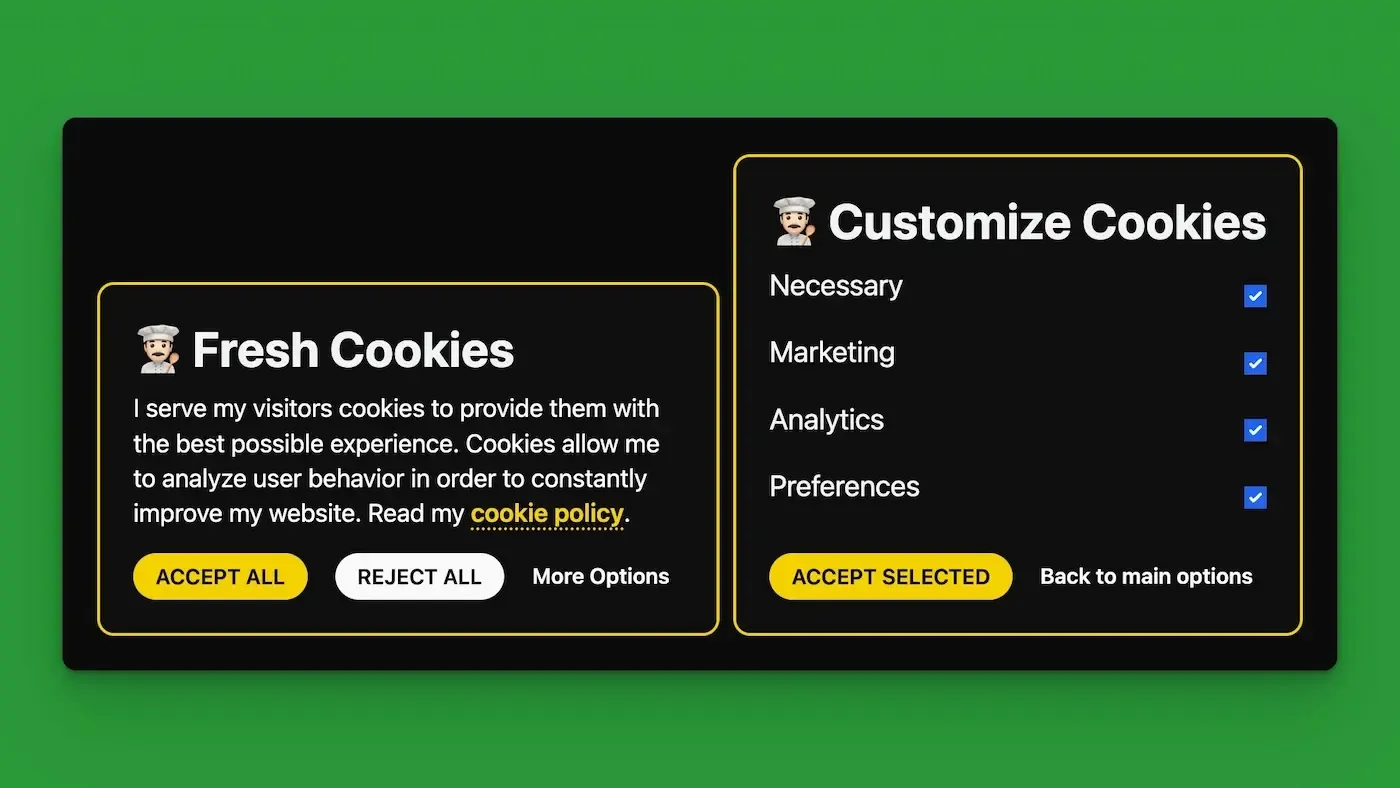
Add the consent banner's HTML

Now that we've set up all the functionality we can add the HTML for our new consent banner. The banner I've built uses Tailwind for all the styling.

Since I'm using SvelteKit, I'm going to be using Svelte's on:click element directive, but you can easily modify this by adding click Event Listeners to the buttons, and calling the appropriate function when the buttons are clicked.

banner-html

<!--  
-- Variables we set above that we'll use now to conditionally display the consent banner

let
  showBanner = false,
  screen = 'MAIN'; // MAIN = accept, reject, more options, OPTIONS = toggle options;
-->
{#if showBanner}
  <div id="cookie-consent-banner" class="fixed inset-x-0 bottom-0 z-30 px-6 pb-6 pointer-events-none">
    {#if screen === 'MAIN'}
      <div class="max-w-md p-6 ml-auto border-2 shadow-lg pointer-events-auto bg-gray-50 rounded-xl dark:bg-gray-950 ring-1 ring-gray-900/10 border-primary dark:border-secondary">
        <p class="mb-2 text-2xl font-bold leading-tight">👨🏻‍🍳 Fresh Cookies</p>
        <p class="text-base text-gray-900 dark:text-gray-50">I serve my visitors cookies to provide them with the best possible experience. Cookies allow me to analyze user behavior in order to constantly improve my website. Read my <a href="/cookie-policy" class="font-semibold text-indigo-600">cookie policy</a>.</p>
        <div class="flex items-center mt-4 gap-x-5">
          <div class="accept-all-btn-wrapper">
            <button
              type="button"
              class="text-sm relative font-semibold button !mt-0 !px-4 !py-1.5 bg-secondary text-black hover:-translate-y-[7px]"
              on:click={acceptConsent}
            >Accept all</button>
          </div>
          <button
            type="button"
            class="text-sm font-semibold button button-white !mt-0 !px-4 !py-1.5"
            on:click={rejectConsent}
          >Reject all</button>
          <button
            type="button"
            class="text-sm font-semibold leading-6 text-gray-900 dark:text-gray-50 hover:underline"
            on:click={() => screen = 'OPTIONS'}
          >More Options</button>
        </div>
      </div>
    {:else if screen === "OPTIONS"}
      <div class="max-w-md p-6 ml-auto border-2 shadow-lg pointer-events-auto bg-gray-50 rounded-xl dark:bg-gray-950 ring-1 ring-gray-900/10 border-primary dark:border-secondary">
        <p class="mb-2 text-2xl font-bold leading-tight">👨🏻‍🍳 Customize Cookies</p>
        <form action="" on:submit|preventDefault={customizedConsent}>
          <label for="necessary_consent" class="flex items-center justify-between">
            <p class="capitalize">necessary</p>
            <input type="checkbox" name="necessary_consent" id="necessary_consent" checked>
          </label>
          <label for="marketing_consent" class="flex items-center justify-between">
            <p class="capitalize">marketing</p>
            <input type="checkbox" name="marketing_consent" id="marketing_consent" checked>
          </label>
          <label for="analytics_consent" class="flex items-center justify-between">
            <p class="capitalize">analytics</p>
            <input type="checkbox" name="analytics_consent" id="analytics_consent" checked>
          </label>
          <label for="preferences_consent" class="flex items-center justify-between">
            <p class="capitalize">preferences</p>
            <input type="checkbox" name="preferences_consent" id="preferences_consent" checked>
          </label>
          <div class="flex items-center mt-4 gap-x-5">
            <div class="accept-all-btn-wrapper">
              <button type="submit" class="text-sm relative font-semibold button !mt-0 !px-4 !py-1.5 bg-secondary text-black hover:-translate-y-[7px]">Accept selected</button>
            </div>
            <button
              type="button"
              class="text-sm font-semibold leading-6 text-gray-900 dark:text-gray-50 hover:underline"
              on:click={() => screen = 'MAIN'}
            >Back to main options</button>
          </div>
        </form>
      </div>
    {/if}
  </div>
{/if}

Some extra styling

Below I've added a little bit of extra styling for the buttons. I have a .button class in my CSS that I use for some default styling.

banner-styles

<style>
.accept-all-btn-wrapper {
  display: inline-block;
  position: relative;

  &::before {
    content: '';
    position: absolute;
    inset: 0;
    background: theme(colors.transparent);
    border: 1px solid theme(colors.black);
    border-radius: theme(borderRadius.full);
  }
}

:is(.dark .accept-all-btn-wrapper)::before {
  border: 1px solid theme(colors.gray.300);
}

.accept-all-btn-wrapper > .button {
  position: relative;
  z-index: 1;
  background: theme(colors.secondary.500);
  color: theme(colors.black) !important; /* overwrite .button color */

  &:hover {
    transform: translateY(-7px);
  }
}
</style>

Was this post helpful?